Due to the loss of our home and workshop we are not able to fill any orders at this time.
Sorry about that!
They come and they go.... Tuesday, February 20, 2018
Lately a number of you long time customers have noted that some of the kits we've done for years are no longer available. Most of the time I pull a kit because we've run out of decals and sales of that particular item aren't good enough to justify re-printing and re-tooling the kit.
Sometimes we just can't get the parts we need from one of our vendors and it takes a while to find someone who can (and will) make up very specialized bits on a small scale for us.We're working on finding new sources of supply, but it will take time.Like all of us, the specialized craftsmen and women who make decals and investment castings as well as photo etch are getting on in years and either retiring or just slowing down.
With a bit of luck, and patience, we'll have things lined up soon with some new outfits so we can bring back the aerobatic planes as well as some of the cars and airplanes that have gone out of production.
Stay tuned!
Building "outside the box" Wednesday, August 9, 2017
You might not believe this, but I get bored. Day in, day out, after 40+ years of model making it can get a bit stale seeing the same old thing on every website and contest table, hanging from the cieling or in my own display case.
Just last night at my local bar I was asked what my favorite airplane was and nearly got punched when my answer was NOT the P-51 Mustang. Like any model builder, I like the Mustang, but other than a few racing variants I am not likely to ever build another.Too many much more intersting and worthy subjects await us out there in history land. The menu is vast, if you're willing to look around and do some research.In this case, google really IS your friend.
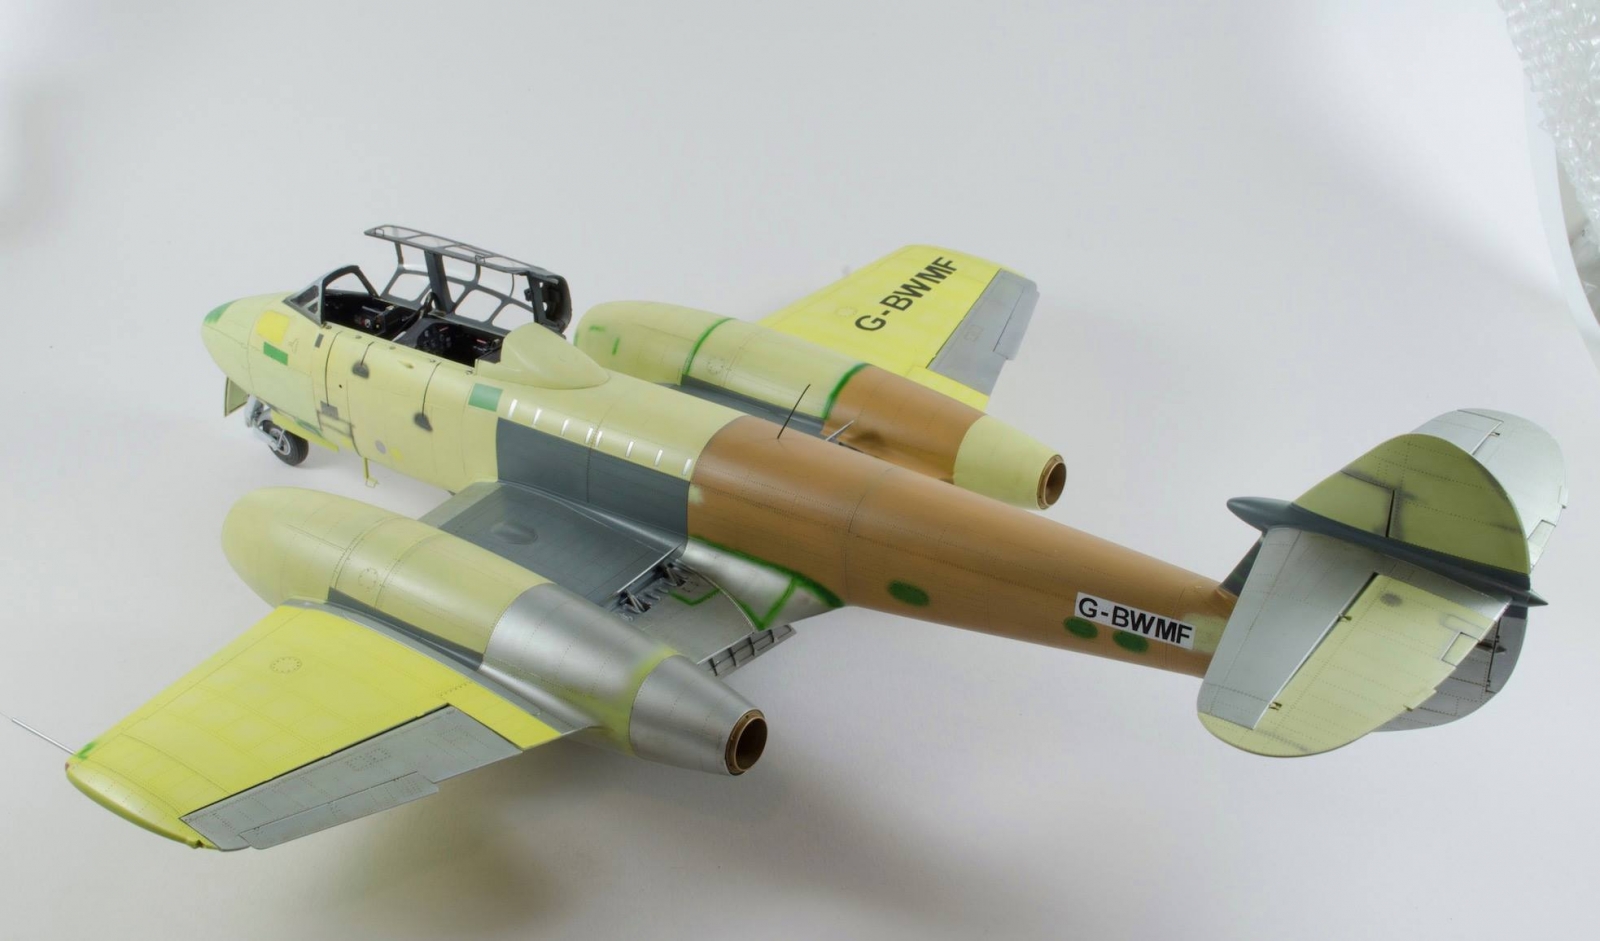
The model pictured above is a perfect example of what keeps me interested in this wonderful passtime.Built over in the UK by James Hatch, this is the Hong Kong Models Gloster Meteor F.4 plastic kit in 1/32 scale, converted to the two seat T.7 trainer using my resin conversion set available on this very website.
Besides being an exquisite example of the model builders craft, this build is of a unique moment in the life of an historic aircraft, finally restored to flying status , but before the inevitable re-paint as a service machine.
The finish, consisting of different types of primer and raw metal offers the builder a very challenging and eye-catching alternative to the usual stuff, and assures a model that will be an instant stand out on any contest table and in any display. You can't miss it.
It will make you think. It certainly got me all fired up when I saw it. I've been lucky enough to be around a fair number of for-real aircrat assembly lines as well as warbird restorations, and there's no shortage of otherwise boring subjects from all eras of aviation ( and automotive ) history that could be built like the model above, somewhere along the way from a pile of bits to flight...Maybe even a Mustang!
Working with clear resin for canopies and other sublime forms of torture. Saturday, February 25, 2017
A number of people have asked about the process of making model canopies with clear resin recently, so finding myself with a spare hour I have decided to write up a blog post on how I do it.
The initial shape, or plug must be made from a hard material, preferably non-porous.Wood is lovely to carve and finish, but ultimately will cause more trouble than it's worth, so it's best to use a synthetic wood like Ren-Shape, or a block of hardened Bondo or a similar filler. The form must be somewhat undersized, as you're going to smash-mold or vac-form heated plastic over it to get the wall thickness you want. Plan ahead! Make the master longer and deeper than the finishsed part so you can trim the edges perfectly square and clean.If your plug is net to the size of the final part at the ends the plastic will roll over the edges and you're back to square one.
Any scratches or tool marks that are on the plug will transfer right over to your future master, so be prepared to spend a long time smoothing and finishing the plug.Soothing music and the occasional adult beverage will help. I prefer Blues and a good gin & tonic.
Once you have a clean plastic shell to work with, you must polish it to a very high finish. I use very fine wet sandpaper ( 600 grit ) for the first pass, with a drop of dish soap in the water to prevent loading up of the sandpaper, which will cause nasty scratches and another beverage, perhaps two.
I then work the surfaces of the canopy master to a better polished finish with varying grits of Micro-Mesh, and then cast a prototype in a silicone rubber mold from which I can make opaque resin castings.There are two reasons for doing this: Firstly, the urethane resin part will be harder than the plastic one in most cases, and will therefore take a higher polish, and secondly because you're going to ruin a few masters scribing lines in them before you get one you're happy with.Trust me on this, it may seem like a pain, but it will pay for itself many times over.
Final polishing is best done with a small felt bob and a Dremel tool.Use fine rubbing compound and then swirl removing compound from the auto pats store.A gentle touch is required here or you will get the part hot and it will deform.
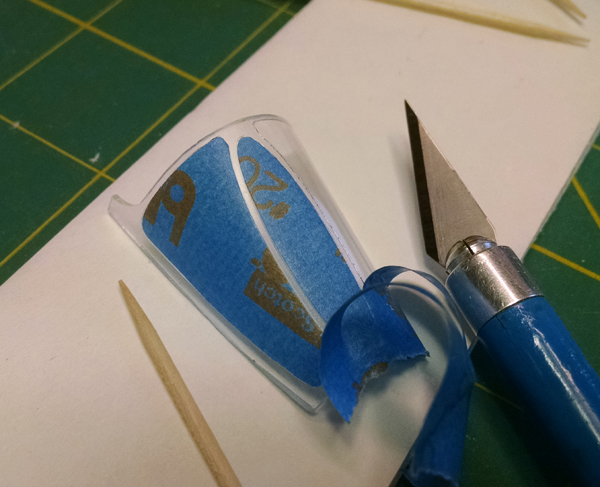
The nifty resin master will need the transparent parts outlined, preferably with fine scribed lines.I use the 3M vinly tape sold in auto parts stores to outline the frames and a sewing needle held in a pin-vise to do the scribing.Black electrical tape is also very good for this.Start out gently, and make a number of passes so as to create a smooth line, then burnish it with a toothpick.These scribed lines are going to be very important later on, so if you muff one, scrap the part and start over.
Once you have a shiny master with good outlines of the transparent bits, you can clean the part with Windex and give it a dip in Future, or Johnson's Klear, Pledge with Future Shine or a similar acrylic floor wax. If all goes well, you will have an extrememly glossy, perfect master from which to make a mold. If you like, you can take Scotch lo-tack painters tape and use that toothpick to burnish it down into the scribed outlines and cut out the frame.This allows you to spray a bit of matte primer onto the frames which will make them more visible later on for painting.Remeber to mask off the interior of the master, ask me how I know!
The finished masters are then molded for casting in clear resin.Most clear resins do not cast well in tin-cure RTV rubber, although it can be done.Platinum cure rubber is best as the resin will not react to it and it will not shrink during cure.
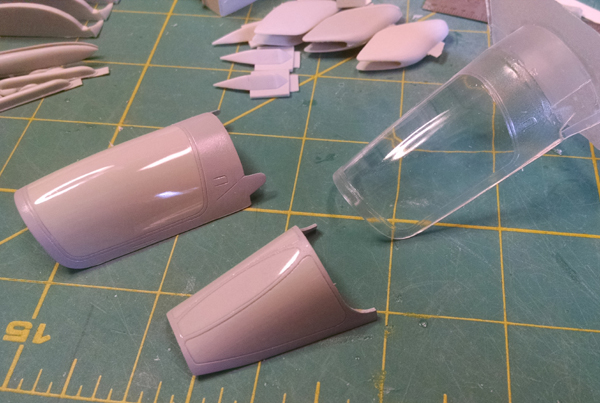
In the photo above you can see the primered frames have a different texture than the polished areas that will remain clear.
There are quite a few clear casting resins available today, my weapon of choice is BJB Industries WC-784 which has proven to be fairly reliable.The resin must be cast into the mold after mixing, and then the mold put into a pressure pot with 35 to 40 pounds pressure piped in to crush any small bubbles.With this resin you must also heat the pressure pot to 120 degrees f and hold it there for three hours or so to get a perfect cure. I do this with an elctric oil heater under the pot, and the whole affair covered with an old blanket to hold in the heat.
As you can see, it's a long, involved process.You can probably find a resin to work with that does not require the heating for a good cure, but either pressure casting or vacuum casting is a must to avoid those pesky bubbles.
It took me a long time to get a reasonbly reliable production technique worked out for this stuff, if you're game to try it I say have at it and good luck! If it was easy, everyone would do it.
Best,
Paul
